Hi Readers,
In this article, you are going to learn how to publish a sql server database project using visual studio 2017?
To know how to create a SQL Server database project using visual studio 2017 then first see this article and then come back.
Step 1: Right click on your database project and select Publish
Step 2: Opens a publish window,
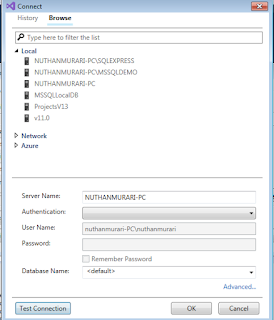
Step 3: For this example, I am going to publish this database into my local, First click on EDIT button and it opens a new window, Switch to Browse tab and then click on LOCAL and here it shows our either many or single server instance name. Select your working instance,
Note: You can select Authentication, but for this example i am using windows authentication. To test the connection, Click on Test Connection and if it shows Test Conncetion succeeded then proceed to click OK or else check your server and other details.
Note: SSMS should install in your system before publishing the database.
Step 4: Customize your database name
Step 5: Click on Publish
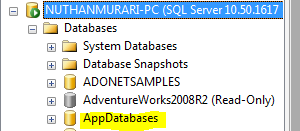
Note: You can see the status inside "Data Tools Operation" and if showing you "Publish completed successfully" then open your SSMS and connect to your selected server instance and see whether newly published database added or not like below,
If any error while publishing then click on View Results and see the actual error which can see inside "Data Tools Operations".
Hope you like this article, Thanks,
Happy Coding:)
In this article, you are going to learn how to publish a sql server database project using visual studio 2017?
To know how to create a SQL Server database project using visual studio 2017 then first see this article and then come back.
Step 1: Right click on your database project and select Publish
 |
| Click on Publish |
 |
| Publish databse window |
Step 3: For this example, I am going to publish this database into my local, First click on EDIT button and it opens a new window, Switch to Browse tab and then click on LOCAL and here it shows our either many or single server instance name. Select your working instance,
 |
| Configure to our database server instance |
Note: You can select Authentication, but for this example i am using windows authentication. To test the connection, Click on Test Connection and if it shows Test Conncetion succeeded then proceed to click OK or else check your server and other details.
Note: SSMS should install in your system before publishing the database.
Step 4: Customize your database name
 |
| Given custom name instead of using same database name |
Step 5: Click on Publish
Note: You can see the status inside "Data Tools Operation" and if showing you "Publish completed successfully" then open your SSMS and connect to your selected server instance and see whether newly published database added or not like below,
 |
| Completion of database publish |
 |
| AppDatabases in SSMS |
If any error while publishing then click on View Results and see the actual error which can see inside "Data Tools Operations".
Hope you like this article, Thanks,
Happy Coding:)

No comments:
Post a Comment