Tuesday 23 July 2019

List of important .net core commands for build and run the projects.

Hi Readers,

Here the list of important and day to day usage od .net core commands. All these below commands are basic one's which used to setup and run .net core applications.


1. To see information of dotnet core,
    dotnet --info

2. To see version of .net core
     dotnet --version

3. To create a new project template
    dotnet new <projectType>
    Ex: console, nunit, and many more..

4. To restore the libraries
    dotnet restore

5. To run the application
    dotnet run

6. To see list of available commands in .net core
    dotnet --help

7. To give a name for the project
    dotnet new console -o <ProjectOutputFolder>
    Ex: dotnet new console -o DotnetDemos 
 
8 . To build the project
     dotnet build

9. To run a specific project 
    dotnet run --project <projectName>
    Ex: dotnet run --project StudentDetails


This article is continuously update with new and helpful commands for our daily work.

Keep an eye on this article and learn by doing with these commands.

Happy Coding :)

How to a find date differences between two dates using c# datetime and timespan?

Hi Readers,

In this article, You will learn how to find a differences between two dates using c# datetime and timespan.

Scenario: Manger asked you to show how much time taken to finish the whole process of the application and here in application has 5 pages to process.

For this requirement, we are going to use Datetime and TimeSpan classes.

To simplify this scenario, Showing here with for loop,

Program.cs

using System;
using System.Threading;

namespace ConsoleAppNew
{
    class Program
    {
        static void Main(string[] args)
        {
         
           // Hold the startTime
            var startTime = DateTime.Now;

            // For 5 pages i am using for loop
            for(int index = 0; index <5;index++)
            {         
            // To differentiate the time, here used Sleep method.
            Thread.Sleep(1000);

            // Gets only time duration
            TimeSpan timeSpan = DateTime.Now.Subtract(startTime).Duration();

            // To see the timespan in terms of hours, minutes and seconds.
            Console.WriteLine(" Time taken to process the current page " + index + " is " + timeSpan.Hours +" hours "+ timeSpan.Minutes +" minutes "+ timeSpan.Seconds + " seconds.");
            }

    }
      }
}


Output for this program is:

 Time taken to process the current page 0 is 0 hours 0 minutes 1 seconds.
 Time taken to process the current page 1 is 0 hours 0 minutes 2 seconds.
 Time taken to process the current page 2 is 0 hours 0 minutes 3 seconds.
 Time taken to process the current page 3 is 0 hours 0 minutes 4 seconds.

 Time taken to process the current page 4 is 0 hours 0 minutes 5 seconds.

Hoping this article gives you a clear understaing on how to use datetime and timespan to get the required time in terms of hours, minutes and seconds.

Happy Coding : )

Thursday 13 June 2019

How to publish a SQL Server database project using Visual Studio 2017?

Hi Readers,

In this article, you are going to learn how to publish a sql server database project using visual studio 2017?

To know how to create a SQL Server database project using visual studio 2017 then first see this article and then come back.

Step 1: Right click on your database project and select Publish
Click on Publish 
Step 2: Opens a publish window,
Publish databse window

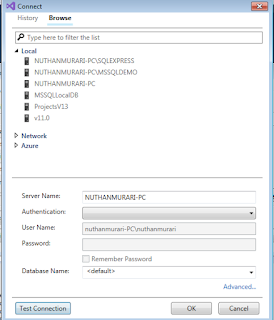
Step 3: For this example, I am going to publish this database into my local, First click on EDIT button and it opens a new window, Switch to Browse tab and then click on LOCAL and here it shows our either many or single server instance name. Select your working instance,


Configure to our database server instance

Note: You can select Authentication, but for this example i am using windows authentication. To test the connection, Click on Test Connection and if it shows Test Conncetion succeeded then proceed to click OK or else check your server and other details.

Note: SSMS should install in your system before publishing the database.

Step 4: Customize your database name
Given custom name instead of using same database name

Step 5: Click on Publish

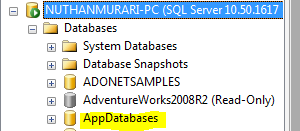
Note: You can see the status inside "Data Tools Operation" and if showing  you "Publish completed successfully" then open your SSMS and connect to your selected server instance and see whether newly published database added or not like below,

Completion of database publish


AppDatabases in SSMS

If any error while publishing then click on View Results  and see the actual error which can see inside "Data Tools Operations".

Hope you like this article, Thanks,

Happy Coding:)


How to create a database project using visual studio 2017?

Hi Readers,

In this article, You are going to learn how to create a database project using visual studio 2017

Most of us know creating a database using SSMS (SQL SERVER MANAGEMENT STUDIO) but there is an another option which provided in visual studio IDE.

As in this article, I am using Visual Studio 2017 to create a SQL SERVER database project.

Step 1: Open your Visual Studio 2017

Step 2: Select New -> Project -> Choose Sql Server under Installed templates
SQL SERVER Template in Visual Studio 2017
Step 3: Give a Name for your database and choose the file location where to save and finally click OK.

Step 4: Now, Our database project created successfully.

Created a Sql Server Database using Visual Studio IDE


Step 5: Its time to create a new table, Kindly follow the same steps
Create a new table
Step 6: Click on Table and it opens a window, Give a name for your table, It opens the SQL Editor window,
SQL Editor for creating a new table 
Note: Either use designer or T-SQL to write queries and the changes updates simultaneously. Once your changes/inputs done just save it.

Hoping this article helps you. Thanks

Happy Coding :)


Thursday 30 May 2019

How PDF Links works the same way of WebSite Links using ABCPDF Library?

Hi Readers,

Scenario: Read any web site/Page using AddImageUrl function in Abcpdf library but Page/Site has links. How in website links perform the same way in PDF also should work.

Solution: The below code performs the same.

Key Points:

1. If we are not using the below two lines then PDF Links are like normal Text.
  doc.HtmlOptions.AddLinks = true;
  doc.HtmlOptions.LinkPages();

2. An important point to remember is order and the place where to add,

   Either add before the following line like below,
   doc.HtmlOptions.AddLinks = true;
   doc.HtmlOptions.LinkPages();
   int theID = doc.AddImageUrl("https://techinuthan.blogspot.com/"); 
   
     Or the other option is the below sample code,

Sample Code:


using System;
using System.IO;
using WebSupergoo.ABCpdf11; namespace Demos_on_abcpdf {     class Program     {         static void Main(string[] args)         {             string theBasePath = Directory.GetParent(Directory.GetCurrentDirectory()).Parent.FullName;
            string outputFolder = theBasePath + @"\Output\";

            // This Doc class is coming from WebSupergoo.ABCpdf11 namespace.
            Doc doc = new Doc(); 
  
            #region Demo 1 Starts -  Multiple Pages inside single PDF With Links action Perform
            doc.HtmlOptions.AddLinks = true;
            // Converts web page to multiple Images in PDF
            int theID = doc.AddImageUrl("https://techinuthan.blogspot.com/"); 
            while (true)
            {
                if (!doc.Chainable(theID))
                    break;
                doc.Page = doc.AddPage();
                doc.AddImageToChain(theID);
            }
 
            doc.HtmlOptions.LinkPages();
            doc.Save(outputFolder + "ConvertWebPageToMultiplePagesWithLinks.pdf");
            #endregion Demo 1 Ends - Multiple Pages inside single PDF With Links action Perform
 
 
            Console.WriteLine("PDF Generated Successfully");
            Console.ReadLine();
        }
    }
}

Output: 
Check output for this code from this GitHub URL : Multiple WebPages In Single PDF With Link Actions

Happy Coding:)

Wednesday 29 May 2019

[Solved] - Your Trail License has expired. Your can Purchase full license from the Abcpdf website

Hi Readers,

If you are facing abcpdf license expiry issue then follow the below steps and fix the problem.

Note: This fix is only for people who already purchased full license of ABCPDF.NET 

Step 1: First Install ABCPDF.NET executable file from ABCPDF website.
             Either 32-Bit or 64-Bit version

Step 2: Once the installation success, Go to the following folder,
              For 64-Bit: C:\Program Files\WebSupergoo\ABCpdf .NET 11.3 x64\

Step 3: Double click on the below EXE (File Name: PDFSettings)
             
Click on the highlighted EXE 

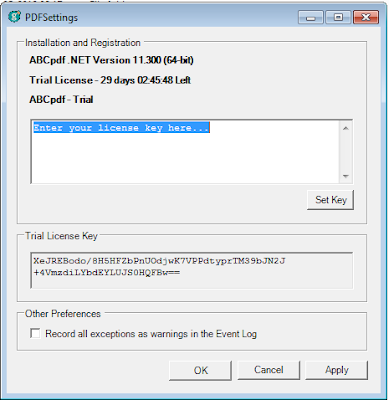
Step 4: It will open the following popup which shows Installation and Registration Information
             If still Trail license is not complete then shows remaining days with a current running time
             or Trail Version is expired


Step 5: Take your purchased key and replace the "Enter your license key here.." with your actual key.

Step 6: Click on Set Key and opens a popup stating that to reflect the key close it.

Step 7: Click on Apply and Ok

Step 8: To cross check whether a key is applied, Double click on EXE and check whether it is showing Professional License instead Trail License Expired and key in the window.

Hope this article solves your problem...
Happy Coding :)


How to generate a pdf with multiple pages using AddImageUrl function in abcpdf library?

Hi Readers,

In this article, using abcpdf AddImageUrl function, generates a pdf with multiple pages.

If Url has multiple pages then PDF has multiple or else only single page PDF will create.

Sample Code:

using System;
using System.IO;
using WebSupergoo.ABCpdf11; namespace Demos_on_abcpdf {     class Program     {         static void Main(string[] args)         {
            string theBasePath = Directory.GetParent(Directory.GetCurrentDirectory()).Parent.FullName;
            string outputFolder = theBasePath + @"\Output\";
           // This Doc class is coming from WebSupergoo.ABCpdf11 namespace.
            Doc doc = new Doc(); 
 
            #region Demo 1 Starts -  Multiple Pages inside single PDF
            // Converts web page to multiple Images in PDF
            int theID = doc.AddImageUrl("https://techinuthan.blogspot.com/"); 
            while(true)
            {
                if (!doc.Chainable(theID))
                    break;
                doc.Page = doc.AddPage();
                doc.AddImageToChain(theID);
            }
            doc.Save(outputFolder + "ConvertWebPageToMultiplePages.pdf");
            #endregion Demo 1 Ends - Multiple Pages inside single PDF
 
            Console.WriteLine("PDF Generated Successfully");
            Console.ReadLine();
        }
    }
}

Note: Chainable checks whether any page is associated with the currentID in document. 
If Yes then create a new page or else break it and comeout from the code.


Output:
Check output for this code from this GitHub URL : Multiple WebPages In Single PDF


Happy Coding:)